Final Project Milestone 3

Hello Everyone,

For my final project, I made a video game about NYU. The game is titled The Game of Life: NYU.

I made it using 4 different libraries:

P5 Dom
P5 Sound
P5 Scene Manager
P5 Gif

For the project itself the concept is as follows:

You’ve been accepted to college, you are now part of the millions of people around the world that spend hours studying for an exam every week. Now that you are part of this community, your task is to graduate. During the path to this goal, you will encounter many challenges and rewards. You will meet people, join clubs, receive internship opportunities, eat food but you will also make bad decisions, pay tuition and you might even have crisis regarding your major.

All of this will take place in the context of NYU. This is a game that will have a total of 5 levels. Levels will be ordered like college (Freshman Year, Sophomore Year etc.) The final level takes place after completing the senior year level. This will be a boss level where you will face the boss Andy Hamilton to receive your diploma. Once you receive it, you beat the game.

For the game these are the controls:

Left and Right for the Player movement
> Space Bar for to pay tuition
> For Game Over:
> 1 to reset game
> For Intro:
> 1 to start game
> 2 to go into options
> For Options:
> 1 to go back
> Sliders to adjust volume

Sprites of the game:

What I have learned:

I’ve learned that spending time on code is actually really fun to do. As a CS Major, I got the opportunity to explore the realm outside of what the CS department gives me. I have learned about working with different libraries, and APIs. I have learned about coding in javascript and in java while also picking up processing as a skill along the way.

For the project itself, I have learned that collision detection is one of the most important aspects of game development. Although most of my collision detection is 2d, spending time making a video game has given me the opportunity to break down a project into a variety of different sections. I have also learned that working with the gif library was difficult. The end product, unfortunately, will not use any gifs.

Here is a link to the game:

www.openprocessing.org/sketch/543417

If you guys have any questions about the code, please let me know. The comments I left can hopefully guide you.


Final Project

For my final project, I created  a virtual pet game.
I wanted to create a game that is funny and make it seem like one of those bad games you can find on sketchy websites. My inspiration came from Tamagotchi and Nitendogs, two games that I enjoyed playing as a kid.

When you click camera, the webcam image becomes the background of the screen. Depending on what the pet is demanding, the player has to click different needs that the pet needs in order to grow the pet. In the end, the pet rock turns into The Rock. After this transformation he claims that he doesn’t need anymore help and that he is on his own. Each demand is timed, so if the player doesn’t help the pet in time, it dies. It is funny how easily this pet dies, considering it is a pet rock. There is a similar game to this, called “Survive! Mola Mola” which is a game where you take care of this ocean sunfish. Despite the size of this fish, it too easily which is why people find this game so humorous.

The biggest struggle with coding this was simply my malfunctioning laptop and the website closing on me. It repeatedly happened to me so I lost my progress multiple times. Once I was done with my other final projects in different classes which required Adobe programs, I was able to clean out my laptop and have open processing run more safely.
Another problem was the timing, it was hard having the demands timed to a specific time. This required a lot of lines of codes.

I wish I had more time to work on this project, and I am actually planning on working on it during summer to have something more polished and more efficient. It was a struggle but this class allowed to me create something online from scratch which is something most people don’t get to do. I enjoy making these silly games and get them to actually work.

My code can be found here:

Final project

I am satisfied with how my sound sequencer turned out. I set upon creating something that the user would like to play around with and get a little lost doing for a little while and I wanted it to make it easy for anyone to spend a little time doing something small and ending up with something that sounds very pleasant. I was inspired by the google audio code project, and the appeal of audio visualizations.  However, it is not perfect, and I don’t think I achieved that goal of having it feel completely seamless.

There are quite a few problems with the way it works right now. One, the code is set up so that the program loops through all the circles many times in the draw loop, and there are many circles to generate in the visualizations, and because of all these for loops, the sketch lags when there are too many notes. This is problematic because the user is restricted on how many notes he should be playing at a given time. However, I personally like to think of it as a good thing in the sense that if the user is restricted to using few notes, it might inspire a little more creativity. Despite that, it doesn’t aid in a seamless experience for the user to do whatever he or she wants.

Another problem of the sketch is due to the way Processing handles time. Because the draw has a framerate, the milliseconds function only refreshes every frame. This causes the program to be inaccurate and create an inconsistency in the spacing between notes that the user can easily notice it. Although the inconsistency is up to low amount of milliseconds, the ear is very sensitive, and it can pick up on these things and take the user out of the experience. This is something I struggled with dealing with in my program, because time management is so integral to my project. I had to learn how to be clever with handling the coloumns of the notes and use a variable capturing the last millisecond measurement and find the difference.

However, what I do have now are circles falling down from the top of the program, and their position representing their relative frequency. I chose the color pallete to turn it more pastel and playful, and due to the way I ordered the FFT bands, it looks like a nice ice cream cone falling. The visualizations are something I definitely improved upon from my presentations on Friday. I gave the visualizations more meaning for the user. I also added a tempo setting, which the user can have a lot of fun and creativity with.

Documentation

https://github.com/ra2353/Creative-Coding-S18/tree/master/Soundcircles

Final post

I had begun to use the kinect contributed libraries and had gotten a rough understanding of some of the differences between three of them. For my final I planned on using the depth and motion tracking capabilities of the kinect to create an interactive display using scripted signals to create an “in hands “3d” object generate. Originally, my  plan was to use a 3d terrain like discussed in class when a person moves there hands into a certain threshold range and apart a certain distance the object would display. The idea is that the person in front of the camera would be moving the terrain with hand motions and the person at the computer would switch between which object is generated for the user to interact with. I was able to execute the first part in displaying the object, however, I didn’t have enough time to consider different terrains or objects to display. I believe my biggest challenge had to be the hardware as most of the library is pretty easy to understand and there isn’t really that much you have to alter in order to display something using the kinect. Its just that due to the subtle differences in the libraries themselves changing one kinect as I soon found out can either have a detrimental impact on how the code executes or that the kinect won’t be recognized at all effectively making all your hard work go to waste.

Shown above, i was able use the Kinect v2 library to get the concept for my other sketch done in time, however, i was unable to get a documented video of my code that I did for the original kinect (kinect 1414). I would like to move forward with this sketch looking more into the kinect v2 library and adding the open cv library in order to change the display space aswell. i think it also might be cool as the groundwork for an interactive display showcase for other peoples art and codes.

Here are my codes in openprocessing:

-in class display(kinect v2):

https://www.openprocessing.org/sketch/547264

-actual final( non functioning without kinect 1414):

https://www.openprocessing.org/sketch/547258


Final Project

For my final project, I set out to use the tools and techniques I had learned during this semester to create an interactive map that people would be able to engage with to find which of multiple dinner parties was closest to them, and to help them get connected to the people hosting it.


You can find my code here!

One of my biggest frustrations with the previous coding classes I’ve taken is that most of the work never goes beyond the complier, and is not something people can find easily and understand what’s happening. So for this project, I wanted to stretch and try to bring an idea fully to realization, incorporating it into a website that would be easily found.

I utilized the google maps API to create the map, and going into this project I thought I would have to pixel-map the markers in order to create them, and using p5.js create functions to trigger events when they are clicked on. Once I did my research after getting into the project and learned about all of the functionalities that the Google Maps API provides, I learned that I was able to do all of that through the API, in a way that is designed much more beautifully and seamlessly than something I would have been able to do.

It didn’t take me long to get from step 1 (creating the map and adding the points and events) to step 2 (embedding it into the map and giving the user ability to manipulate the canvas), but it took forever to try and figure out step 2. This project started off appearing very ambitious, then through the API’s seemed much simpler, then became nearly impossible once I dove into the computer-generated code from squarespace that made up the website I was seeking to embed my map into.

I feel that I made two critical mistakes that led to my project not finishing as I imagined it would. 1) I made a (rather large) technical aspect of my project based on skills that I hadn’t quite developed yet. I wanted to stretch but I should have stretched within the bounds of the canvas and p5.js, instead of reaching out. 2) My project was dependent upon understanding and interacting with code that I didn’t have any documentation on, connection to, and that was not written for humans to interpret. This left me stuck at the second stage for the majority of my time working on this project, troubleshooting visibility issues and errors that popped up out of nowhere that were hidden within several hundred lines of code.

Overall, I am proud of myself for being able to access and understand using the Google API, which I can see being very useful in the future, as well as navigating the different challenges of this project, from acquiring server space to combining javascript with html and css, learning how to work with a project that spans multiple files, and how to ask for help when I know I need it. One of the best classes I’ve taken at NYU thus far. Thank you Scott.

Final Project Documentation- Bird Sound Game

For my final project, I have created an audio focused game that is played by a user listening for a bird sound’s in various scenarios. A user then can press a key if they think they heard the bird and based on; if they were right or wrong. The user would then gain points or loose attempts. If you use up more than three attempts you lose the game. The game really requires a user to use their listening skills and tests the user’s ability to focus. Below I have attached a picture of the games start screen. The link to the game and all of its code is:

https://alpha.editor.p5js.org/shahriarsadi98/sketches/BkHJGovhz

A link to the google drive to access much of the games audio files and visuals:

https://drive.google.com/drive/folders/1hJmN0dj4OaV0l20YK7rFIx935Wz5Lb6X?usp=sharing

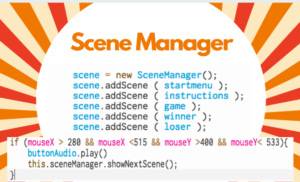
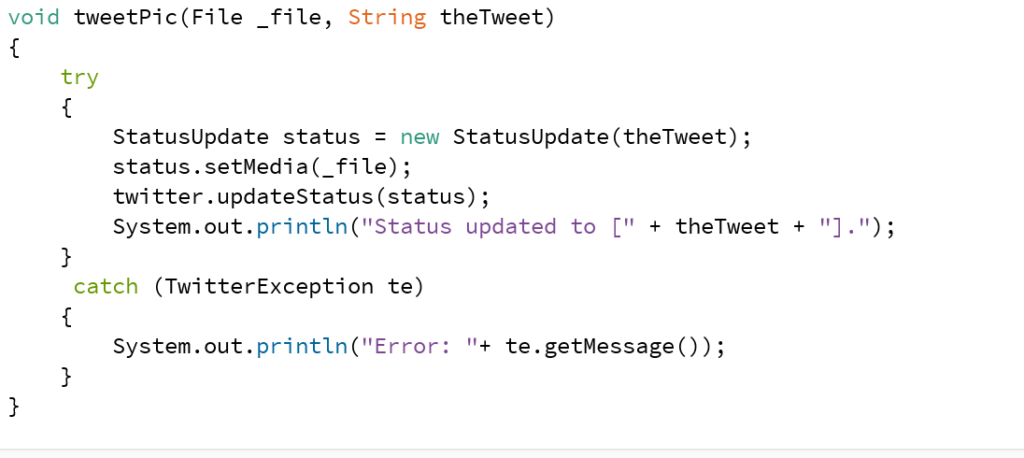
I created the game solely in p5js, I chose to use p5js over processing in Java is because of the libraries in p5js, the most important of which was scene manager. Scene manager allowed me to create a start menu, and instruction menu, a game function, winner and looser screens. Using scene manager I was easily able to switch to those scene’s and not have one scenes code effect others. Below I have attached an image of some snippets of the scene manager code. I also had various menus with buttons which would lead to new scenes and having scene manager really made the process easier.

Another crucial aspect of the game was a timer, I need the timer in order to keep track of what time the user clicked on the key and if it matched up with the correct time the bird sound played. The timer had to be activated exactly when the user was in the game function menu. I did not want how long the user was on the start menu to affect the game. So I created a variable called offset to mitigate that issue and subtract it from a variable I had called game seconds. Below I have attached an image of some of my code for the timer.

An issue that I ran into while making the game was that the audio would run in a never-ending start loop, that sounded screechy. I mitigated this by creating a preload function and the audio played smoothly. Scene manager made it easy so the audio files only played when they were in their given menus. I created a point system and attempt system under my key pressed function and setting if statements to check when the key was pressed and to act accordingly. I have attached below, screenshots of both the attempts and score code snippets.

My game also has this visualizer which I coded to move with how loud the sound is in game. To give the user a visual in to maybe help the user in a way and overall I think it looks cool and helps with the overall game aesthetic. One addition I wanted to add to that portion was color changing based on if the user gets an answer right or wrong. I tried to get it to change color, but everything I tried simply did not work. Hopefully, in the future, I can fix this.

For the future of this game, I would like to do two things, one have the game be more automated and random. Right now the game follows a sequence if the audio clips and random and unpredictable in when the bird will come. It will make the game more challenging and fun. I already have an idea on how to achieve that. Which would be to upload all bird noises and scenarios into p5js and then creating an algorithm to play the sounds randomly and then a if statement to see if a specific bird sound is played and the user clicks a button then give a point. Another addition I would like to add is a high score system and then a twitter bot that would tweet out anytime the high score is beat. I believe both of those are possible and something I will be working on over the summer.  I hope you enjoyed my final and having me as a student. I really enjoyed your class and learned a lot. I hope to one day have a class with you again thank you very much for a wonderful semester.

If you would like to see the slides I have attached them below here as well.

Bird Audio Game Final Presentation

Final Project Documentation

For my final project, I have created a code for 5 min live coding performance. Initially I wanted to simply make a visualization of a song that I like but as I progressed and learned more about gibber library, I started to make my own sound. The interactive experience that my project provides is a little different from the interactive sketches that I’ve created previously, since the audience is just watching me interact with my code. However, I kind of fell in love with this form of performance and live coding and I would like to explore further into this field in the future.

My code is written in the order of execution rather than being organized by each object or sound element. This means a code for manipulating the element of the variable ‘b’  might be written in between ‘e’ and ‘f’. Also, each body of code divided by the spacings is meant to be highlighted all together and executed all at once.

The main idea behind the progression of this audiovisual performance is that it starts off with a stable and rhythmical audio and visual pattern and as the code progresses the pattern loses its stability and goes into a complete chaos until a voice calls out for help. The rhythm of drums, plucks, and bass from the beginning matches (kind of) and putting them in a melody (D, E, Bb, A) makes the sound stick to your head. Then, I introduce a sad man’s voice with a white noise, indicating a transition. The sounds and visuals introduced after this are less rhythmical and more dreamy and formless. On top of these dreamy synth sounds, I start to add distortions and panning to break the sound even further. The visual is pixellated and modified with multiple filters/shades to reflect the sound. Although many components of this performance are organized and planned, several parts, such as notes and rhythms for each instrument/sound, were randomized so while practicing the performance, I would like one performance better than another one because it sounds better. I ran into many cases where the plucking (has a random rhythm) did not quite match the drums, so I would panic from the beginning of the code but I would just figure it out by changing the rhythm or just moving on.

The work process had three parts: 1) putting together the audio element. 2) making each section of visualization. 3) Integrating them all together and deciding the order of the code for the performance. Part 1 was fun and only required me to decide on instruments that I want, notes, and rhythm and put them together so that the whole thing sounds good to me. It started to get slightly more challenging with from part 2 because the visual elements should reflect on the audio that I’ve created. One thing that I learned during this process is that a good sound visualization does not always reflect the master output. For example, the part where I introduce the robotic voice, I made the visual reflect the voice output rather than the master output because that makes the visualization more dynamic and look authentic to the audience. The last part was about organizing everything so that I can come up with something complete and presentable.

One difficulty that I faced that I could not solve was the problem with freesound.org API. I wish I had recorded the sound when the API worked because that I really liked how the freesound samples worked with my sound. gibber was created 5 years ago and after a while it started to have problems with the API. Charlie Roberts, the creator of the library, came up with a fix 2 years ago, but I assume freesound has changed its API policy and included a different authentication process since then.

Anyways, I had a lot of fun with this project and I wish to learn about other techniques of live coding so that I can build a solid knowledge and skills around this type of coding.

Code: https://www.openprocessing.org/sketch/546066

Recording: https://www.youtube.com/watchv=ubU9xgEJvzI&feature=youtu.be

Final Project Post

Most of you live in NYC and hopefully and none of you have to commute long distances.My project had a simple goal. To display the most popular subway lines and their stations in the Borough of Manhattan and to show at least one train object going along the subway lines.I used longitude and latitude coordinate from google maps as a reference for each stop but in the real world these coordinates are almost identical so I had to shift them drastically in my program. My initial goal was to pull in data from the MTA and to set up the train speeds and positions.I was going to use higher level Object Orientated Programming such as Inheritance and polymorphism and maybe a data structure such as a doubly linked list to store the stops.However, from the Professors comments I looked at my project and realized that I wont be able to finish this in a week.So I decided to write raw code, using nothing but the built in types to create my program from the ground up. I went through many different design implementations when working on my code. Looking back now there are probably ways I could have optimized my code to make it look better and less clunky and less hard coded for the most part. I was greeting really frustrated that I never got the display to work properly and that is really the only thing I would like to fix in this version hopefully. I was going to use a library class called Tracer but I didn’t understand how to implement that library so I asked the professor for some help on how to do it with out the tracer class. This class has taught me a lot of how to use code to visualize things in the real world. Im not the most artistic person so although art that was created by code has its own purpose its just something I don’t want to pursue. I’m more of a functional programmer who enjoys making code that can be used as tools and optimize peoples days. My plans for this moving foreword is to begin development on an app that will map the subway stops and stations in real time so people can know exactly where their trains are. I would obviously have to know more about processing and graphical programming but I have an alpha version. I would also like to teach my self OpenFrameWorks because C++ is the language I prefer but I definitely am going to take the Java class because Java kicked my ass with this project so time to kick back.

https://www.openprocessing.org/sketch/546054

https://onlinegdb.com/BkyBrr2Tf

https://drive.google.com/open?id=1Fkiwz10AaB6M5kS2zv5tJ8I6_u7GTR3y

The second link is data processing code written in C++ its only source code. The third link is the entire solution with the text files and implementation files. You would a C++ IDE and text editor if you would like to compile the the code and see the output.

Final project- cat tweetbot

To achieve my project, I need to make capacitive sensor connects to Arduino IDE, then to processing and processing to twitter. There are two libraries to support my code: processing.serial and twitter4j (http://twitter4j.org/en/index.html)

The main function of my project is to get the sensor controls when to send twitter, so I started with setting up Twitter API. I tested with using keypressed to Tweet.

Then I tried to Tweet with a button. Here is the part I got problem with. I made Arduino IDE send a string to processing “YES” everytime the button is pressed. Processing can receive and println in the console but cannot tweet with this command. (I can’t make this work) I think this problem may be caused by the type of data. (It works when I get int values from the capacitive sensor)

After that, I wired up the capacitive sensor. I did the test capacitive sensor first and it works perfectly. But the second time, it wouldn’t show any data in the Arduino IDE. I tried the exact same code and wiring as before but it didn’t work. I changed the resistor, wiring, and breadboard. Luckily it worked in the end.

Paint the box:


Next step:

To improve my project, one of the most important parts is to set a limit/constraint to the data received by Arduino. The value now in the processing is a little bit hard to control. Next, I would use the image taken by the webcam to upload on Twitter. I always want to make a stand-alone device and I figure out I can use Xbee to let Arduino connects to processing wirelessly.


code: https://github.com/yueningbai/final_cattoy

test video:
https://vimeo.com/268033313


Final Project

For my final project I decided to try and make a music video player that utilizes the audio analyzer function to make for a more interactive experience between the sonic and visual. Additionally, I wanted to make it so the video that played was determined by the input of the viewer; operating almost as a type of Jukebox that can play different content depending on the inputs given by the viewer.

In doing this I decided that I wanted to bridge the coding class assignment with my own personal work and interests in a way that was more intentional than before. I wanted to actually film music videos for my songs that could serve as elements in the final piece; interacting with the code and bridging my music, film making and new computing skills in a cohesive manner. I shot both videos in the span of 2 hours on two separate days.

I then began by taking the visualizer that I’d created for the DOM library assignment and breaking it down to see how it could apply to my music video. I decided that given the song I wanted to use, the “scribble” library would be an interesting spin on my earlier project, incorporating geometric shapes and graphics that emulate the disorienting and scratchy texture of the song.

I succeeded in creating the sketch in which the video worked in tandem with the visualizer, but I was unable to make the input welcome page lead into the video. Additionally, when I attempted to load the second video into a different sketch using the same method as the first; the sketch refused to run.

I’m frustrated that I was unable to make a finished product, but ultimately I’m happy I managed to make one video that is significantly enhanced by the code it works with. I hope to continue this project in the future.

WORKING MUSIC VIDEOS

WalkWithME:

FLICKR:

FINAL SKETCH (non-functional): https://www.openprocessing.org/sketch/543712#